
1979 Carb Rebuild (Pt 1)
- Mightyzod
-

- New Member
-

- Thanks: 0
Please Log in or Create an account to join the conversation.
- Haggler
-
- Offline
- Premium Member
-

- Posts: 119
- Thanks: 39
Re: 1979 Carb Rebuild (Pt 1)
8 years 5 months ago
Great article, very informative thank you for taking the time to post ")
Please Log in or Create an account to join the conversation.
- Dion
-
- Offline
- Sustaining Member
-

- Posts: 152
- Thanks: 42
Re: 1979 Carb Rebuild (Pt 1)
8 years 3 weeks ago
Hi Scotch
very informative,
i used a watered down degreaser of which i tried a sample inside the diaphragm cap, looked great
as i had been boiling the carbs, i thought why don't i just add some to the boiling water!, Dah bad idea, especially as i did not work out the ratios water/degreaser
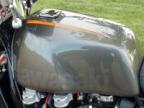
sent the center body/cap/bowl BLACK, what a mess took ages to get the black greasy substance off, which left them looking rather magnesium in appearance
you can see the center bowl in pic, i then at Robs suggestion took it to a powder coater, who dipped it in their solution, lot better but not what it was, will be pulling apart again when i get my second lot of stainless screws(lost first)
also soaked in thinners for 12 hrs after boiling just to make sure, these carbs had been abused and where in a mess
i have question im not sure if some how i have missed something in the cleaning!, fitted up to find
1, leak from bowls drain, figured it as the drain screws on 2 not sealing,! so put all three through my lathe (Dewalt battery hand held type) file first then 600 wet/dry beautiful .
2 i hooked up Robs vacum gauges to balance carbs, Rob was unable to effect change on the center carbs regards to balancing.
outside ones ok, any one come across this before, carbs where completely dismantled and complete kit put in,
im running no air box standard pipes presently, will probably have to jet up slightly but that is not the problem, bike revs nice but carbs cough
have not fitted up your floats yet,do you or anyone have a measurement for standard float height please?
the alloy bar is 20mmX4.3 thats all i could get is why!
still a lot lighter than original and looks wholly better
Dion
very informative,
i used a watered down degreaser of which i tried a sample inside the diaphragm cap, looked great
as i had been boiling the carbs, i thought why don't i just add some to the boiling water!, Dah bad idea, especially as i did not work out the ratios water/degreaser
sent the center body/cap/bowl BLACK, what a mess took ages to get the black greasy substance off, which left them looking rather magnesium in appearance
you can see the center bowl in pic, i then at Robs suggestion took it to a powder coater, who dipped it in their solution, lot better but not what it was, will be pulling apart again when i get my second lot of stainless screws(lost first)
also soaked in thinners for 12 hrs after boiling just to make sure, these carbs had been abused and where in a mess
i have question im not sure if some how i have missed something in the cleaning!, fitted up to find
1, leak from bowls drain, figured it as the drain screws on 2 not sealing,! so put all three through my lathe (Dewalt battery hand held type) file first then 600 wet/dry beautiful .
2 i hooked up Robs vacum gauges to balance carbs, Rob was unable to effect change on the center carbs regards to balancing.
outside ones ok, any one come across this before, carbs where completely dismantled and complete kit put in,
im running no air box standard pipes presently, will probably have to jet up slightly but that is not the problem, bike revs nice but carbs cough
have not fitted up your floats yet,do you or anyone have a measurement for standard float height please?
the alloy bar is 20mmX4.3 thats all i could get is why!
still a lot lighter than original and looks wholly better
Dion
Please Log in or Create an account to join the conversation.
- scotch
-
 Topic Author
- Offline
- Sustaining Member
-
- Posts: 1991
- Thanks: 885
Re: 1979 Carb Rebuild (Pt 1)
8 years 3 weeks ago - 8 years 3 weeks ago
The only way to set the Brass Floats is the "wet" method. RE: Sync'ing carbs. It's important to have the Choke/Fast idle static adjustment done first to ensure the throttles are closing near the required measure. The synchronization will fine-tune this setting. There should be a tiny bit of slack in the throttle cable with throttles closed on the idle adjustment screw, with no choke. With FULL choke the throttle plates should close completely for full vacuum/full choke plunger lift. I've found that setting the throttle plates statically prior to installation, makes the sync'ing easier. Cut 3 strips of stationary/printer paper 1/8" to 3/16" wide and about 4" long. Open the throttles and insert the strips in the venturi and allow the throttles to close on the paper strips. Adjust the sync screws so all three carbs close on the paper. Use a strong source of light from the opposite side of the venturi's to see the gap. If you've pre-adjusted correctly, the very slight resistance to pull the strips of paper out, should be the same. Lightly "snug" the lock nuts and reinstall on engine. Sync as required. It takes VERY little adjustment on the sync. screw to effect a vacuum change. With every adjustment "snug" the adjusted locking nut. It's not uncommon to go back and forth a number of times to get the 3 carbs equal. If the engine RPM is slow to return to idle (or does not at all) you may have one or more of the sync adjusting screws turned IN to it's limit. In other words - The compression spring in the adjuster link has been compressed tight and this causes the ball-joint(s) to bind. This will make sync'ing impossible.
RE: Jetting - DON'T ! Not until you have the carbs sync'd, the idle mixture adjusted ( Color-Tune or by ear) and you've put some miles on the adjustments. Arbitrarily re-jetting before you know for a fact that everything else is operating to spec is a waste of time and money and is NOT a cure for poor adjustments. I've stated this repeatedly: I've rebuilt many sets and always run them on my bike before selling. I've NEVER had to change jetting !!!!!!!!!. The carbs are very forgiving in terms of air-filter/air intake systems. I have a DG header and a custom intake with a K&N Oiled-filter and run stock jetting. I have the main-needles in the #3 slot. I've tried Leaner by one slot respectively and had to return to the #3 slot. The plugs burn "Tan" and clean!
Re: <....black greasy substance off, which left them looking rather magnesium in appearance....>
Going to jump head long into this with no offense intended. Not knowing to what degree "the Mess" has affected the Carb metal I will caution you: Consider the fitment of the diaphragm piston to the bore as critical ! If you're lucky you may get the surface/finish in the bore back to original with some lacquer-thinner, cloth/paper towels and lots of elbow-grease. A VERY FINE metal polish could be used also. Attempting to clean the bore with ANY other kind of abrasive i.e. steel-wool (will imbed particles and potentially cause rust and seizure), Wet sanding (will remove base material) .......will potentially cause fitment and possibly tuning concerns. So NO, - DON"T Use Your Dewalt and Slave-Cylinder Honing Stone !
There is absolutely no way of knowing what issues the caustic cleaning solution has created.. Hopefully the parts are not destroyed, functionally.
hint - Switch center and left bowl and you'll find the drains more readily accessible. Hope this helps !
1980 KZ 1300 sr# KZT30A-009997
Always High - Know Fear !
Always High - Know Fear !
Last edit: 8 years 3 weeks ago by scotch.
The following user(s) said Thank You: zed_thirteen, Dion, PaulD
Please Log in or Create an account to join the conversation.
- tackelhappy
-
- Offline
- Platinum Member
-

- Posts: 426
- Thanks: 167
Re: 1979 Carb Rebuild (Pt 1)
8 years 3 weeks ago
"as i had been boiling the carbs, i thought why don't i just add some to the boiling water!, Dah bad idea, especially as i did not work out the ratios water/degreaser
sent the center body/cap/bowl BLACK, what a mess took ages to get the black greasy substance off, which left them looking rather magnesium in appearance
you can see the center bowl in pic, i then at Robs suggestion took it to a powder coater, who dipped it in their solution, lot better but not what it was, will be pulling apart again when i get my second lot of stainless screws(lost first)"
Not that this friend of mine can help you much in view of the distance between you two, but the photo's may help you find a way of cleaning the outside of those carbs.
He does vapour honing, - a slurry of fine glass beads and water inside a sandblast cabinet, as well as soda blasting.
www.tophrestorations.ca/latest.html
" If you can't say what you think, very soon you won't be able to think !
OKANAGAN FALLS. BC ,Canada
OKANAGAN FALLS. BC ,Canada
The following user(s) said Thank You: Dion
Please Log in or Create an account to join the conversation.
- Kawboy
-
- Offline
- Sustaining Member
-
- Posts: 3219
- Thanks: 1153
Re: 1979 Carb Rebuild (Pt 1)
8 years 3 weeks ago
Well you're not the first and probably not the last to boil a set of carbs in a " favorite concoction" and get into trouble. Hot acid or hot caustics are a lot more aggressive.
Vapor blasting is a form of surface cleaning using chips of frozen carbondioxide gas. The chips are not very aggressive and the byproduct of this type of cleaning is the material being removed and carbondioxide gas. The only issue here is the specialized equipment needed so it's not a do it yourself project.
Soda blasting is slightly more aggressive and setting up for sodablasting is relatively cheap. The sodablasting media is also fairly cheap. The only issue here is the sodablasting media is a one shot deal. Once used it's done so a lot more waste involved.
Either way you can get the outer surfaces cleaned up. The problem I see is what happened inside all of the circuit passages. Some of those passages are super small. I'm concerned that you won't be able to get them cleaned up.
Please Log in or Create an account to join the conversation.
Time to create page: 0.182 seconds