Welcome, Guest
Username: Password: Remember me

TOPIC:

Installing water pp cover and thermostat... hints/tips 3 months 3 weeks ago #32049

  • dcarver220b
  • dcarver220b's Avatar Topic Author
  • Offline
  • Sustaining Member
  • Sustaining Member
  • Posts: 781
  • Thank you received: 181
It leaked.Here we go again, I need to fire my tech <me>.Worse yet, when I removed the housing, the water pump impeller circlip was missing.

Yep. Not there.

Kawboy from KZ1300.com had mentioned that circlip #1 looked to be incorrect.

I sourced another and installed it.

Sidenote: After she was buttoned up, several days later, found a circlip closely resembling the size and shape, laying on the outodoor concrete pad.WTFO? I had several, purchased at local hardware store.. Did this one escape?Picked it up, put in the circlip collection drawer.

Now this. Was it incorrectly installed? Did it jump out of the landing onto the concrete?

Do I have circlip somewhere in the water block now?

Lemons to Lemonade
* Didn't have to remove exhaust headers.
* Gives me a chance to ensure header bolts are tight after about 5 minutes of run time.
* The bike ran cool, took longer than 'normal' to reach operating temp. Maybe the Cermakoat headers are working?

Here's the infamous LubriPlate. I'll clean it up and use coolant next time.

The manual says the transfer tube can be moved upward to facilitate housing removal.
I don't see how. It's bottomed out, and the tube was still slightly in housing. DUH. Manual says to move the tube
DOWN, not UP. It's hard to be humble... 

I have a new seal, but hope to re-fit this one, this time using 3-Bond to seal the spring side seal half into the block.

Decided to stop for the day. Getting cold, I'm tired, cranky, and my hands hurt.


The nice red glow is from infrared lamps... Brr.

Please Log in or Create an account to join the conversation.

Last edit: by dcarver220b.

Installing water pp cover and thermostat... hints/tips 3 months 3 weeks ago #32050

  • Kawboy
  • Kawboy's Avatar
  • Offline
  • Sustaining Member
  • Sustaining Member
  • Posts: 2999
  • Thank you received: 1031
I feel your pain,BUT if your work area isn't comfortable to work in and free and clear of obstacles, and it's not  the only toilette in the house and it's broken, then now is not the time to do a job for the firstime. You need time to work through the procedure with full attention to what your doing with no distractions. As a supervisor, attention to detail was paramount and quite often I  had to ensure my guys work area was suitable to work in and their heads were on the job and not thinking about something other than the task at hand. That process started with saying good morning and how's your day going so far? You can't imagine how many times I benched someone because shit was going on at home and they weren't mentally fit to do a task at work that demanded their full and complete attention.

Time to take a  chill pill and get things sorted out so you can do your best work. You'll  get there. I know you can do it but at the moment you  are your worst enemy.  You cant win if your fighting yourself.

Please Log in or Create an account to join the conversation.

Installing water pp cover and thermostat... hints/tips 3 months 3 weeks ago #32054

  • dcarver220b
  • dcarver220b's Avatar Topic Author
  • Offline
  • Sustaining Member
  • Sustaining Member
  • Posts: 781
  • Thank you received: 181
After an appropriate ass-chewing from Kawboy at KZ1300.com, (You are your own worst enemy!)
decided to slow down and work it in afternoon daylight hours where the lighting is better.Also, the day broke with sunshine and warmer temps and me with a new improved 'tude.  This time watched the videos listed earlier in the diatribe, RTFM, got a better pair of glasses... 

With very arhtritic fingers, didn't trust myself to not launch the impeller shaft o-ring into never-never land...
So found a long socket about the same OD as the shaft, then transferred it from socket to shaft. 
Using lube of course. Things work better with lube. This worked GREAT.

Unlike last time, applied 3-Bond to the machined surface just below "Made in Japan", after cleaning it up of course.
Applied 3-Bond to mating surface as well.

The other sealing surface is just outside of the oil seal. Cleaned it up and applied 3-Bond.

As my dimensional Metrology instructor said... "Clean, Clean Clean." So I did. Both mating surfaces, 
then a squirt of coolant on both before impeller assembly. A cheap syringe from Amazon works good for this purpose.

SS circlip from Zed parts. Based upon previous (next post)

Please Log in or Create an account to join the conversation.

Last edit: by dcarver220b.

Installing water pp cover and thermostat... hints/tips 3 months 3 weeks ago #32055

  • dcarver220b
  • dcarver220b's Avatar Topic Author
  • Offline
  • Sustaining Member
  • Sustaining Member
  • Posts: 781
  • Thank you received: 181
KawBoy comments regarding proper seating, made sure it was properly fit.

Looking closer, I did not like it. Then I went to wiggle on the impeller, it wasn't engaged? Just spinning on shaft.
WTFO? 
So removed it and looked closer.

I don't have pics, but the impeller back side has two machined recesses that mate to the shaft. The shoulder on mine is boogered up a bit.. 
So cleaned it up best I could and reassembled. This time, made sure the tab and slot engagement was good and proper. Not easy for my hands
to push impeller against spring, then wedge it with wood wedges, AND get the circlip on.

If at first you don't...try again?

Please Log in or Create an account to join the conversation.

Last edit: by dcarver220b.

Installing water pp cover and thermostat... hints/tips 3 months 3 weeks ago #32056

  • Kawboy
  • Kawboy's Avatar
  • Offline
  • Sustaining Member
  • Sustaining Member
  • Posts: 2999
  • Thank you received: 1031
Not meant to be an ass kicking Don. Sorry if it came across that way.

Time and time again, I see people not setting themselves up for success and when they fail, they get pissed off and usually, they hammer through the task again and an even worse failure happens. "Attention to detail" is not a common understanding for most people. Most guys just plough through and "Get 'er Dun." And the end result is usually a short lived fix. 90% of a successful job is all in the prep including a fundamental understanding of the task at hand.

Now, about that circlip- When you have a new circlip sitting in your hand and you look at it, the ears on the circlip are a certain distance apart from each other usually somewhere around .020-.025" and when installed correctly, should look the same and have a very slight grip on the circlip groove but not so tight that you can't spin it in the groove with your finger tip.
What I see in the picture tells me that either the circlip is too small or there is something wrong with the groove. Either the edge of the groove is rolled in or there's a piece of debris in the groove preventing the circlip from fully seating. Whatever it is, you need to figure it out and fix it. I have a set of jeweller's files for cleaning up damaged metal. Another good tool especially for cleaning up circlip grooves is a 6" hacksaw blade from a coping saw. Thin enough for the job.
I figured I needed to support my thoughts with pictures so.......


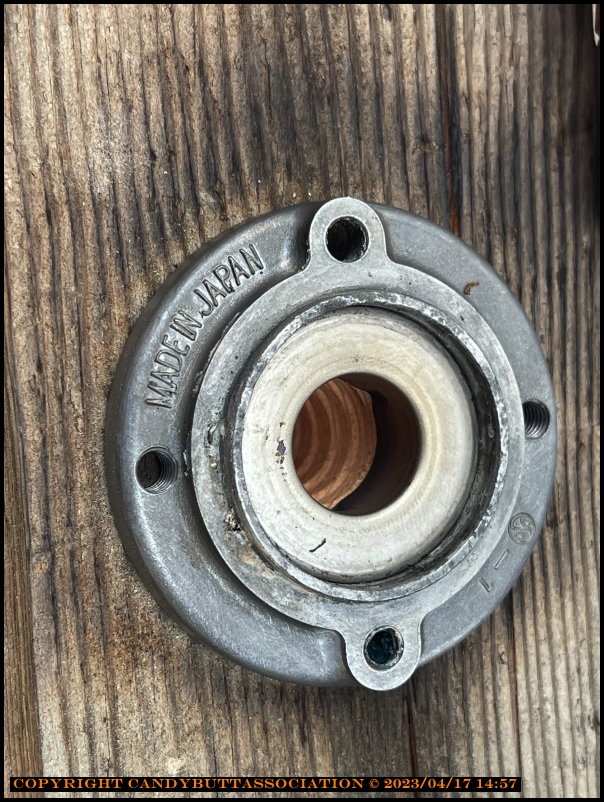
This is a pic of a brand new s.s. circlip from Zed-parts and as I was saying, you can see the tabs are about .015" apart.

 
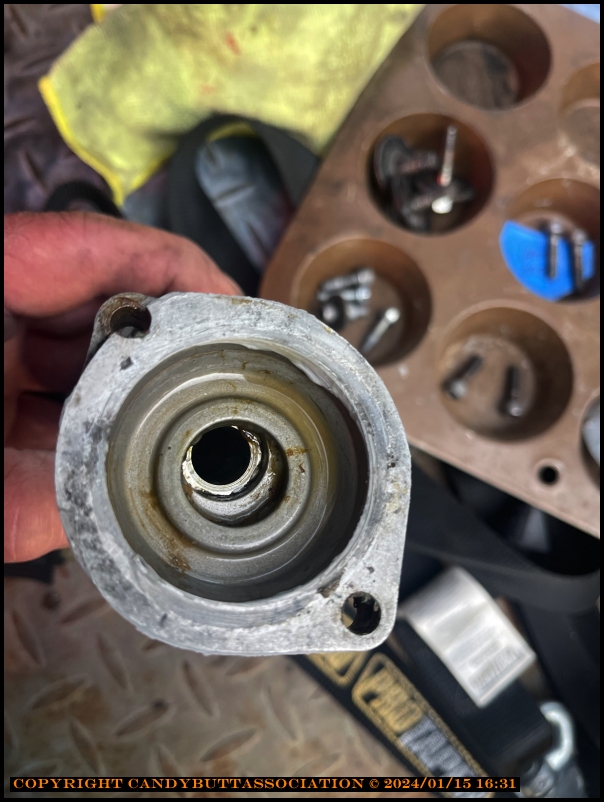
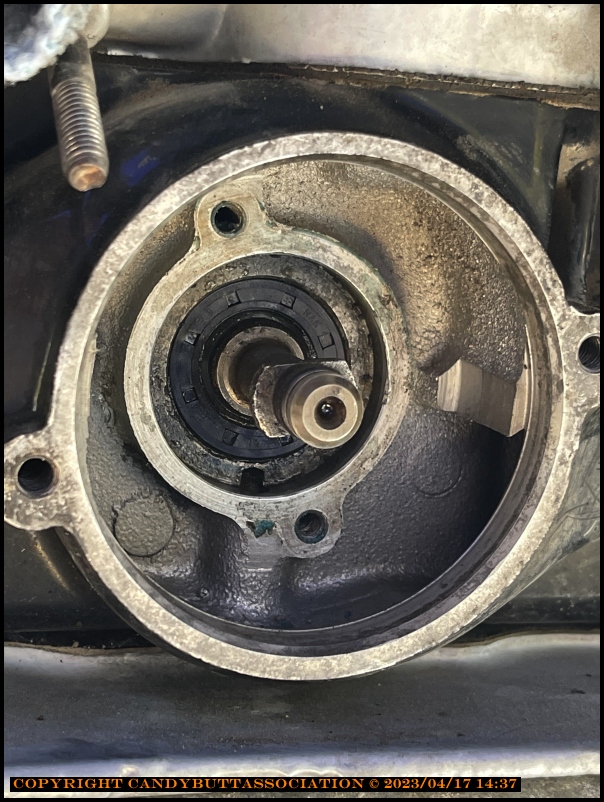
This is the end of my water pump shaft before cleaning the groove there was a fair bit of crud in the groove

 
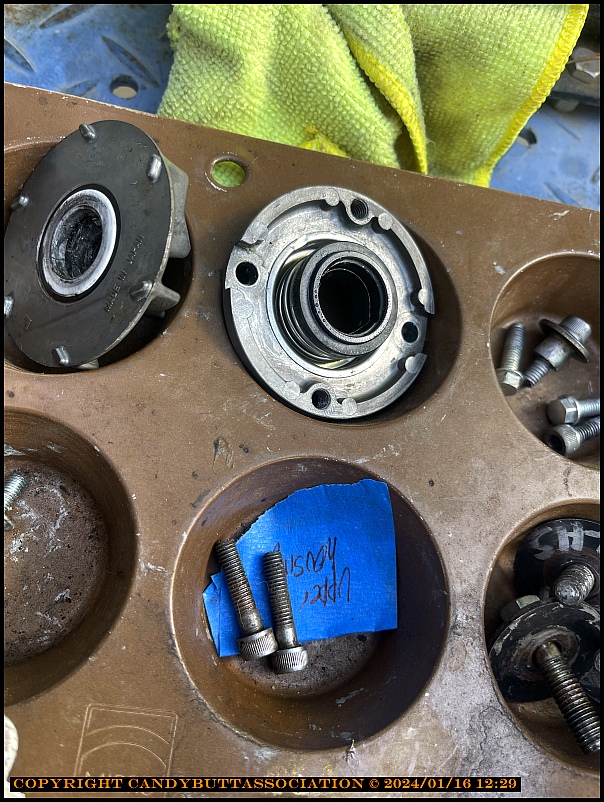
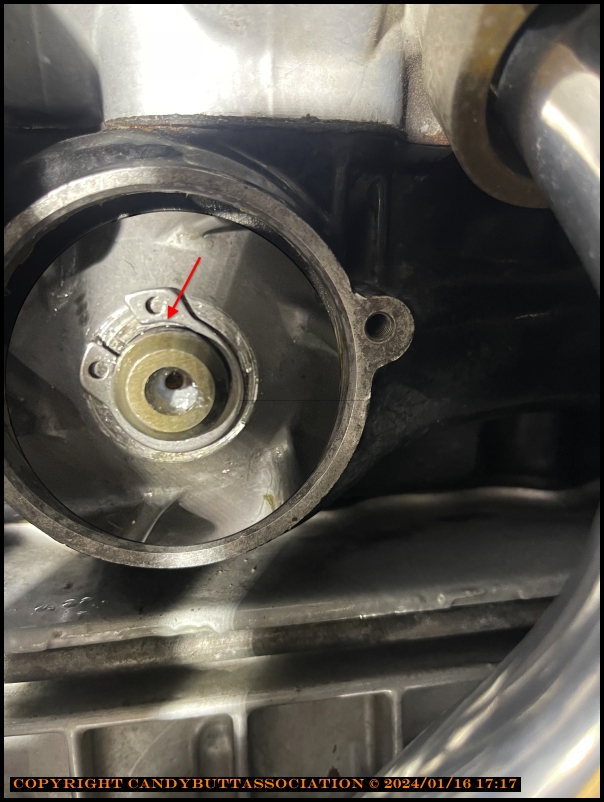
After cleaning with a needle file

 
This is the new s.s. circlip installed on the shaft AND as far as I'm concerned the groove in the shaft is about .010" not deep enough in diameter. I can't spin the circlip on the shaft  AND I will fix the depth of the groove before I finish this job. I've run across this kind of issue many times at the plant and I'm sharing my knowledge for your entertainment. Hopefully, people can benefit from what I try to explain. This "stuff" is not common knowledge and maybe only a few "tradesmen" would know the proper fitment of something as simple as a circlip. In nuclear and aircraft mechanics, we all know what happens when the small stuff is overlooked.
Just like 2 weeks ago when a Boeing 737 Max lost a maintenance door off of the midship. fortunately it didn't hit the elevator when it blew off and the plane was safely landed BUT during the incident, an 8 year old passenger one row behind the door, had his shirt ripped off of his body and had to endure 20 odd minutes without a shirt at below zero temperatures until the plane landed. It could have been worse. He could have been sucked out of the plane as well. What really pisses me off is that in the previous few weeks, the low cabin pressure alarm had gone off spuriously, and the crew decided it was a sensor failure rather than heeding the alarm and landing the plane for a maintenance check. Absolutely against all protocols. They should have heeded the warning rather than excusing it. What makes it even worse is that the plane was brand new like maybe 7 weeks old and if you know anything about new equipment failures you know that we call them a bathtub curve failure. if something is going to fail it will happen early in the life of the equipment or at a point in time when normal parts wear out it when time lines are met. 

I had a mechanic who lost the knurled thumbwheel off of the end of a 6" caliper and unfortunately it fell off the caliper inside the 450 Mw generator housing during a shutdown overhaul. 6 months later we had a catastrophic failure of that generator and we found the cause. That knurled thumbwheel made its way into the generator windings and caused a short in the windings. $7 million dollars for a new generator rotor and a 63 day shutdown to change out the rotor at $3 million dollars a day in lost revenue. All this because of a simple lack of attention to detail. The mechanic logged in the 6" caliper and logged out the caliper in the Foreign Material Exclusion document, but he failed to ensure the tool was intact. 50 cent part that caused a $200 million dollar repair. This kind of stuff makes a Supervisor (me)  grow gray hair 


This might be a better pic of before cleaning


And this is after I had cleaned up with the needle file and this is what I had installed the circlip on. Note the ridge at the bottom and top of the groove that probably is still holding up the circlip off of the bottom of the groove. it doesn't take much especially when the groove is so shallow.


Attachments:
The following user(s) said Thank You: dcarver220b

Please Log in or Create an account to join the conversation.

Last edit: by Kawboy.

Installing water pp cover and thermostat... hints/tips 3 months 3 weeks ago #32057

  • dcarver220b
  • dcarver220b's Avatar Topic Author
  • Offline
  • Sustaining Member
  • Sustaining Member
  • Posts: 781
  • Thank you received: 181
"This is the new s.s. circlip installed on the shaft AND as far as I'm concerned the groove in the shaft is about .010" not deep enough in diameter. I can't spin the circlip on the shaft  AND I will fix the depth of the groove before I finish this job. I've run across this kind of issue many times at the plant and I'm sharing my knowledge for your entertainment. Hopefully, people can benefit from what I try to explain. This "stuff" is not common knowledge and maybe only a few "tradesmen" would know the proper fitment of something as simple as a circlip. In nuclear and aircraft mechanics, we all know what happens when the small stuff is overlooked."

So took a closer look. KB is right. Check this out.

Fortunately, nothing is buttoned up. Almost looks like the clip is 'sprung'. Will also check the groove like KB suggested.
I have jewlers files..

Thanks to KB for keeping me on my toes. Sometimes truth hurts, but if one learns and changes... then it's all good.
 

Please Log in or Create an account to join the conversation.

Last edit: by dcarver220b.
Time to create page: 0.145 seconds
Powered by Kunena Forum