
First ride on a 1300
- Whiskey1300
-
 Topic Author
- Offline
- Premium Member
-

- Posts: 82
- Thanks: 17
First ride on a 1300
3 years 1 month ago - 3 years 1 month ago
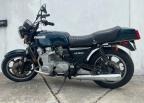
Well guys… she’s up and running. For those of you that haven’t seen my past posts, I’ve spent the last 9 months restoring my dads 81. With a little (aka a lot) of help from some friends and everyone on this forum I was able to bring her back to life. She’s still a little dirty but doesn’t leak and runs like a champ.
In fact I’m literally out in my first ride right now. And… well… I’m in love. I was having so much fun riding around with my stupid ear-to-ear grin that I forgot I only had a gallon of gas and have run out of fuel. (Fuel sending unit still needs some work) hahahaha

Luckily there was a pizza shop nearby and a gas station just beyond that. Hahaha! So far so good!
Well thanks for listening!
Cheers!!!
In fact I’m literally out in my first ride right now. And… well… I’m in love. I was having so much fun riding around with my stupid ear-to-ear grin that I forgot I only had a gallon of gas and have run out of fuel. (Fuel sending unit still needs some work) hahahaha
Luckily there was a pizza shop nearby and a gas station just beyond that. Hahaha! So far so good!
Well thanks for listening!
Cheers!!!
-Cheers
Whiskey-1300
Whiskey-1300
Last edit: 3 years 1 month ago by Whiskey1300.
The following user(s) said Thank You: PaulD
Please Log in or Create an account to join the conversation.
- dcarver220b
-

- Offline
- Sustaining Member
-

- Posts: 1273
- Thanks: 294
Re: First ride on a 1300
3 years 1 month ago - 3 years 1 month ago
What a great read! And she looks beautiful too. Thanks for the pics of pizza and motobike porn.. ")
Now go fill the tank up, ride around, take lots of pics, tell us what it's like to ride a 40+ year old bike for the first time.
Most of here on the site are old with fading memories.. LOL
Now go fill the tank up, ride around, take lots of pics, tell us what it's like to ride a 40+ year old bike for the first time.
Most of here on the site are old with fading memories.. LOL
Last edit: 3 years 1 month ago by dcarver220b.
The following user(s) said Thank You: Whiskey1300
Please Log in or Create an account to join the conversation.
- Kawboy
-

- Offline
- Sustaining Member
-
- Posts: 3243
- Thanks: 1198
Re: First ride on a 1300
3 years 1 month ago
Congrats on getting the bike straightened out and enjoy the trip down memory lane. There's a reason your Dad kept the bike and maybe it was to share with you, something that was near and dear to his heart. Appreciate the gift and here's hoping you'll keep it and enjoy riding while thinking of your Dad.
Cheers,
KB
Cheers,
KB
The following user(s) said Thank You: Whiskey1300
Please Log in or Create an account to join the conversation.
- Whiskey1300
-
Topic Author
- Offline
- Premium Member
-
- Posts: 82
- Thanks: 17
Re: First ride on a 1300
3 years 1 month ago - 3 years 1 month ago
I felt like a viagra pill with a face. Hahaha. Getting this machine up and running after so many years and going on my first ride has been one of the best experiences I’ve ever had. I can remember riding around with him as a small child, sitting up on the tank. Even back then I remember thinking “this is f***ing cool”.I’ve done just under 100 miles in 24 and it’s safe to say I’m addicted. This is one of those things I’ll have for a lifetime… or who knows. I may pass it on to my future kid one day. I’ll be taking it over to my dads in a couple weeks. He has no idea that I pulled it out of storage. Should be a awesome surprise. And a big thank you to everyone on this forum. You all have so much knowledge and experience, and have created an invaluable resource that will surely help keep these beautiful bikes on the road for years to come.Cheers everyone
-Cheers
Whiskey-1300
Whiskey-1300
Last edit: 3 years 1 month ago by Whiskey1300.
The following user(s) said Thank You: dcarver220b, Kawboy, PaulD
Please Log in or Create an account to join the conversation.
- scotch
-

- Offline
- Sustaining Member
-
- Posts: 2030
- Thanks: 932
Re: First ride on a 1300
3 years 1 month ago
When my Dad was discharged from the Royal Canadians Navy in '45, he bought a "War Surplus" Harley '45 which he rode up to 1951. I didn't get the privilege of "inheriting" it because he sold it to buy my Mom an engagement ring !
When I bought my '80 I took him for a ride.....for nostalgia ! There was no shortage of explanatives when I got him him back at home. That's one of my memories.
I'd love to see the look on your dads face when he see's his resurrected "13" !
Something you will remember , certainly.
Good on ya !
When I bought my '80 I took him for a ride.....for nostalgia ! There was no shortage of explanatives when I got him him back at home. That's one of my memories.
I'd love to see the look on your dads face when he see's his resurrected "13" !
Something you will remember , certainly.
Good on ya !
1980 KZ 1300 sr# KZT30A-009997
Always High - Know Fear !
Always High - Know Fear !
The following user(s) said Thank You: Whiskey1300
Please Log in or Create an account to join the conversation.
- BigSix
-

- Offline
- Platinum Member
-

- Posts: 783
- Thanks: 246
Re: First ride on a 1300
3 years 1 month ago
Thanks for posting. Reminds me of when I had bought mine back in 94. hard to get the grin from the face. And I still get it anytime I pull her out of the garage.
Holger
Holger
Z1300 A1/ KZT30AG built 1979
frame KZT30A 004285
engine KZT30A 000288
location: borderland-triangle France/ Germany/ Switzerland, Europe
frame KZT30A 004285
engine KZT30A 000288
location: borderland-triangle France/ Germany/ Switzerland, Europe
The following user(s) said Thank You: Whiskey1300
Please Log in or Create an account to join the conversation.
Time to create page: 0.171 seconds