
79 carb issues
- Kawboy
-

- Offline
- Sustaining Member
-

- Posts: 3247
- Thanks: 1202
Re: 79 carb issues
11 years 2 months ago - 11 years 2 months ago
That "looks like" a main jet full of paper towel debris, but what's it screwed into? And what's all the orange wool fluff from? Shop towels? That crap looks to be too big to go past the needle seat, so I suspect it was in the carb before you buttoned it up.
Working on carbs is like open heart surgery. Things bigger than 010." left behind will clog up the "arteries" of your carb. Fiber strands from cloths will not breakdown and pass and inevitably end up gathering at a restriction and "clog the drain" so to speak.
You can get away with leaving fibers hanging around in other parts of the bike with no arm since moving parts will break down the fibers and debris. In the engine, this crap will be flushed back to the oil filter and cleansed from the oil. Obviously, almost any debris which finds it's way into the carbs will stay in the carbs. What's the point of doing a carb overhaul if you don't clean the fuel system feeding the carbs?
Any carb rebuild should be augmented with replacement of the fuel filter or in the case of the KZ1300 removing the fuel shut off valve and cleaning the micro screen. Who knows, you might have a cracked inlet screen and crap in the tank making it's way into your carbs that you've spent days rebuilding. flush out the tank with fresh gas before installing the shutoff valve. also it's a good time to replace the fuel line, But don't assume that the new fuel line you just bought from your supplier is clean. you don't know how it was stored, so flush out the new fuel line with clean new fuel before installing. Baby spiders are known to hide in tiny small places and a fuel line laying on a shelf is a perfect place to hide from predators.
Sixpipes, I'm not trying to bust your balls here but there's a lesson here for which many can learn from. CLEANLINESS IS NEXT TO GODLYNESS and the utmost care must be the cardinal rule when working on the internals of carbs. White paper towel is your friend. Almost all debris is not white. When cleaning carb parts, wipe them down with white paper towel. If you see anything other than white paper towel, the part is still dirty. If you blow out emulsion tubes and jets etc. with compressed air, back the part up with white paper towel. After you blow out the item, check the paper towel. If you see anything, repeat the process until you see nothing on the towel, then put that part off to the side on a clean sheet of paper towel. If for whatever reason you have to quit for the day, cover your cleaned parts with a paper. You wouldn't believe the crap that gets airborne when someone opens the garage door. (Think heart surgery)
Don't assemble anything until you've completed cleaning all the parts. Now you should clean all of your assembly tools. You just spent a great deal of time cleaning everything, so why would you assemble the item with dirty tools and contaminate your work? (Think heart surgery) Do you see a theme here?
I know you've been at this for the past 18 months and you're totally frustrated and I don't blame you, but don't let the frustration get to you. You'll keep messing up if it does. Be patient here. Learning how to do the required work on carbs should be a course all on its own and learning how to do open heart surgery on the fly on your baby is not the way to develop the skill, but it's your play toy and not your primary transportation.
I can almost bet after you get this bike running like a dream, you'll be the next go to guy for "All things carbs". There are those who learn from formal teaching and then the ones that learn from what my dad called the "School of Hard Knocks" (and he seemed to use that phrase when talking about me all the time)
Last edit: 11 years 2 months ago by Kawboy. Reason: spelling
Please Log in or Create an account to join the conversation.
- scotch
-

- Offline
- Sustaining Member
-
- Posts: 2031
- Thanks: 937
Re: 79 carb issues
11 years 2 months ago - 11 years 2 months ago
Not much to add. I'm word for word with kawboy's comments.
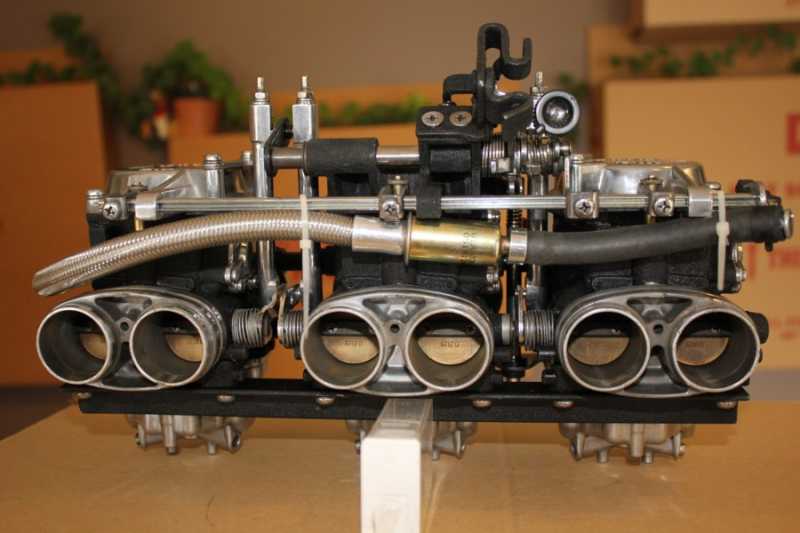
The photo: The "idle' jet has been placed on another object for the purpose of the photo, but at first I thought it was a "glow-head" from a "Cox .049" model engine ! That should date me! )
Very hard to believe the jet shown could be "that" plugged from debris left in the circuit after cleaning.........but, "whoops, there it is" !
Re. your query about where to fit an inline fuel-filter: That's the best question you could have asked at this point. Do yourself the biggest favor you could bestow upon yourself and give some serious thought to taking your "Right-side" carb to someone competent and have them "Tap" a 1/4" pipe-thread into the outside blank "fuel-boss" and do a simple, effective and efficient Fuel-line routing conversion. It'll be easy for anyone with some real experience with "taps and dies" and the minimal cost to have this done (should take 30 minutes or less) will be worth it. The 90 degree fitting is readily available, easy to assemble and I guarantee that you'll wish you'd done this at the very beginning of ownership. You do not need to have a coupling at the 90 degree fitting as I did. The fitting can be a simple 1/4"MPT X 1/4" brass barb; meaning the fitting will thread into the carb. and the fuel line can slipped directly onto the "90" barbed-end and be secured with a clamp. The stock "fuel-Tee" between the left and center carb. is simply "capped." Now would be the opportune time to accomplish this while the carbs are off and apart. That fuel-boss will need to be drilled-thru to get the fuel into the fuel delivery gallery. This part is best done on a drill press so if you do not have one or are not comfortable doing this you can probably get it done when the threading is taking place.
You'll not regret this mod.
1980 KZ 1300 sr# KZT30A-009997
Always High - Know Fear !
Always High - Know Fear !
Last edit: 11 years 2 months ago by scotch.
Please Log in or Create an account to join the conversation.
- SIXPIPES
-
Topic Author
- Offline
- Senior Member
-

- Posts: 51
- Thanks: 1
Re: 79 carb issues
11 years 2 months ago
OK, so let me begin - no you are not busting my balls.
The butterfly's were out of sync but only because of the way I fitted them, I tightened the screws up as I went along which I found was not the correct way to do it. In the end I just pinched the screws up on each butterfly and then opened and closed the butterfly's a few times to centre them up, this worked and they now are as good as I can get them. If I shine a torch through the carb you can see small amounts of light at the side of the butterfly's but there is nothing I can do about that. I balanced the butterfly's up using a strip of paper so they all just gripped the same amount and then took of the throttle adjusting screw so that they all closed up the thickness of the paper.
I will however admit to being a complete f---ing idiot and overlooking one small part.
The orange fluff is just off the towel on the bench it was not in the carbs. It is not paper it is the crap that you find in the carb bowel off a bike that has been parked up for years.
I have now cleaned the carbs again - they are spotless.
Still the issue of where all that crap came from though, I drained the tank and found nothing at all.
I removed the petrol tap and found the filter spotless.
Only leaves the tap itself so I removed the filter, the tap, the tap internals and the brass pipe. The brass pipe, tap body was full off the same crap that was in the carb, that has now been cleaned and re fitted. I have now checked every nook and cranny that could hold any contaminants at all - every thing is clean. New cleaned petrol pipe as well.
I will also carry out the modification for another filter.
Now this has all been done I feel very confident that come tomorrow/Thursday the bike will start first time and be tuned up with no issue's at all.
ONLY TIME WILL TELL
TRIUMPH T120R,BSA A7,BSA A10,BSA SPITFIRE,BSA ROCKET 3 RV,ARIAL SQ 4,S.O.S, RUDGE, BENELLI 750SEI,BENELLI 900SEI, KZ900, SUZUKI GT750, SUZUKI RE5, KAWASAKI H1A, KAWASAKI H2, MOTO GUZZI 850T, NORTON FASTBACK, NORTON INTERSTATE, SUNBEAM S8.
Please Log in or Create an account to join the conversation.
- Kawboy
-
- Offline
- Sustaining Member
-
- Posts: 3247
- Thanks: 1202
Re: 79 carb issues
11 years 2 months ago
First let me apologize if I've offended you. That is definitely not the intent here. You've been working on these carbs for 18 months and not quite done yet. I'm sure you've learned a lot about these carbs through this experience and as frustrating as it may seem, this is a learning experience. Why else would we be here if it wasn't for sharing experiences and learning. I like Scotch have had a great deal of experience with many different brands of carbs and I feel your frustration and only wanted to help.
I also believe that sharing our knowledge on forums such as these only helps our fellow brothers and sisters in their endeavors to keep the old bikes running. Remember you're fighting a 35 year old machine whose equipment has been fiddled with by many hands. Sometimes the work that you do is simple. Sometimes it's completely frustrating because some others have completely messed it up.
For the record, I worked at a Chrysler dealership for 5 years and specialized in Tune up Electrical and A/C. I've probably rebuilt 300-400 carbs and always thought I did a good job. Since joining this forum and reading through Scotch's Blog on carb rebuilding, I've determined that over the years I've always blown out ports in the carbs with absolutely no thought to blowing out the ports in reverse to the way the fuel air flows so I would not jam debris down in the bottom end of the smaller ports. As good as I am, Scotch managed to teach me something for which I will be eternally grateful. And so I spend hours on this site as do others sharing our expertise in order to advance the knowledge of those who choose to learn. I'm also here to learn.
Again, I didn't mean to offend you and if I have please accept my apology.
John
The following user(s) said Thank You: scotch
Please Log in or Create an account to join the conversation.
- SIXPIPES
-
Topic Author
- Offline
- Senior Member
-
- Posts: 51
- Thanks: 1
Re: 79 carb issues
11 years 2 months ago
Hello John,
Please thee is no need to applogise, there is nothing wrong with constructive critism. You comments were there to help and they do, if my reply sounded like I was pissed off then I should be the one apologising not you. I am truly thankful for all of the help I have received from everyone, I cannot thank you all enough.
I have been a maintenance engineer all of my life and the mistakes I made are amauterish at best. I have tried to be honest in my replays just like you have so any other members hopefully will not make the same stupid mistakes that I have.
Please keep posting your help is invaluable,
Thanks
Andy
TRIUMPH T120R,BSA A7,BSA A10,BSA SPITFIRE,BSA ROCKET 3 RV,ARIAL SQ 4,S.O.S, RUDGE, BENELLI 750SEI,BENELLI 900SEI, KZ900, SUZUKI GT750, SUZUKI RE5, KAWASAKI H1A, KAWASAKI H2, MOTO GUZZI 850T, NORTON FASTBACK, NORTON INTERSTATE, SUNBEAM S8.
Please Log in or Create an account to join the conversation.
- Kawboy
-
- Offline
- Sustaining Member
-
- Posts: 3247
- Thanks: 1202
Re: 79 carb issues
11 years 2 months ago
Not a problem, We're good. Stick with it, and don't forget, a case of beer helps when shit happens.
Please Log in or Create an account to join the conversation.
Moderators: scotch
Time to create page: 0.196 seconds