Welcome, Guest
Username: Password: Remember me
Electrical
  • Page:
  • 1
  • 2

TOPIC:

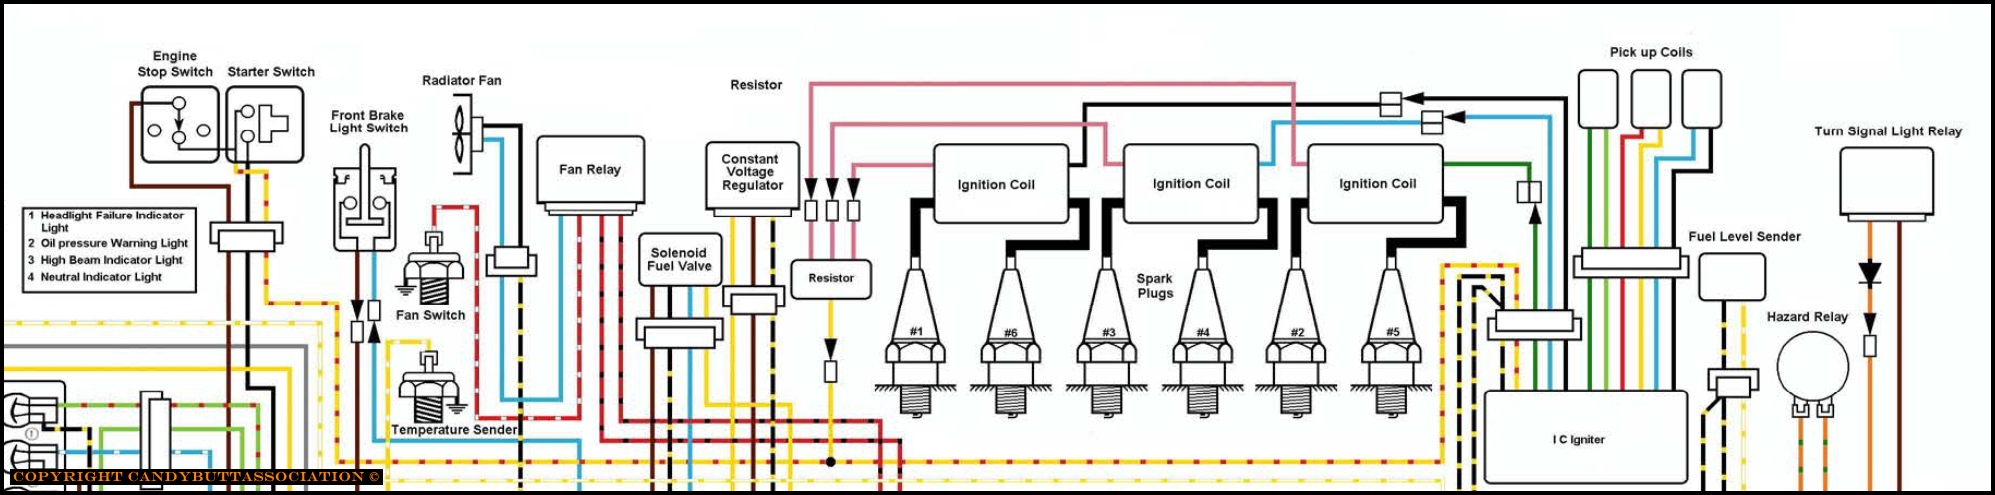
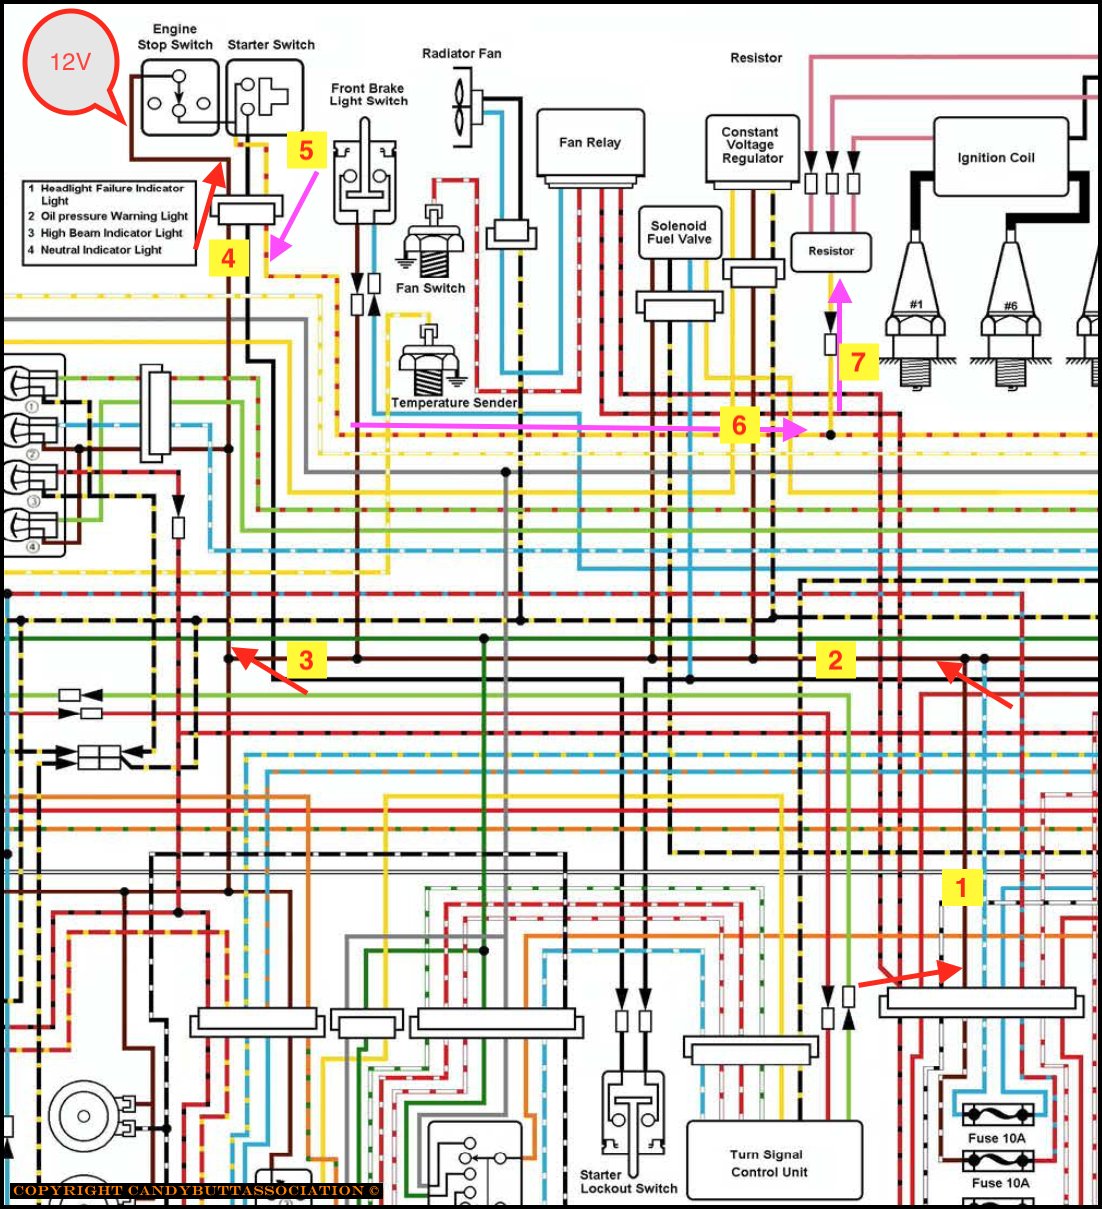
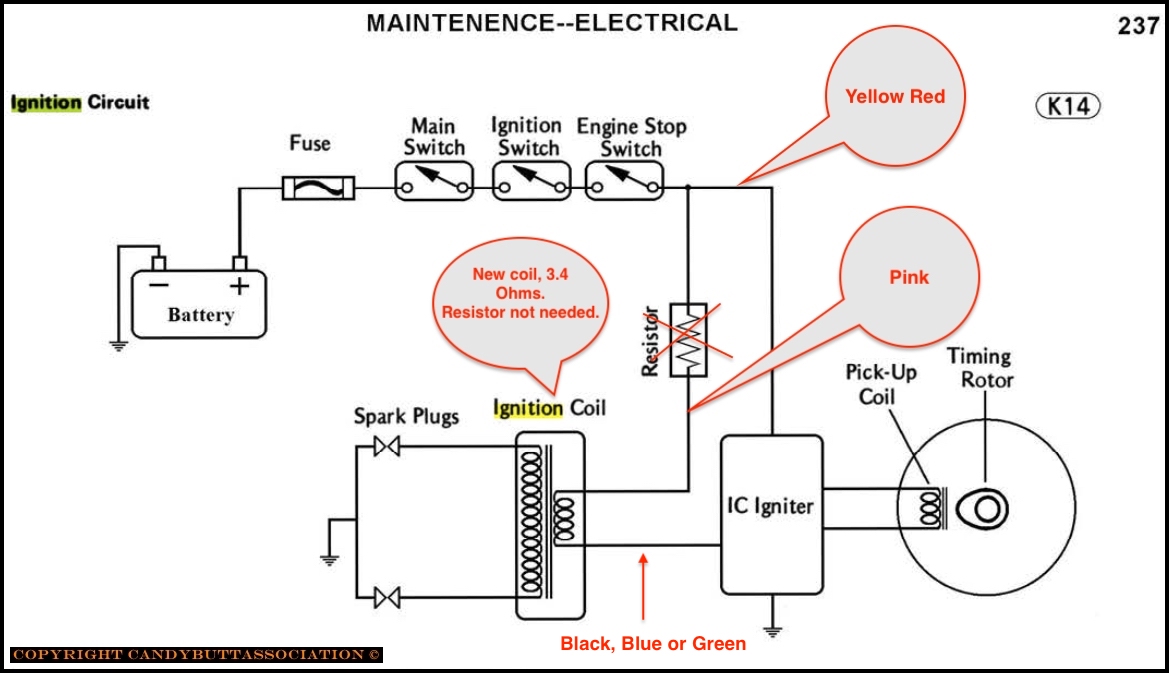
Replacement Coil Wiring question - eliminating ballast resistor 5 months 3 days ago #31759

  • dcarver220b
  • dcarver220b's Avatar Topic Author
  • Offline
  • Sustaining Member
  • Sustaining Member
  • Posts: 779
  • Thank you received: 181
I should preface this post with a Mia Culpa. I really should know this stuff better. But I've also learned that when working on old equipment, BE SURE YOU KNOW IT'S RIGHT BEFORE APPLYING ENERGY... 

Apologies in advance for the length of this post. It's a learning experience, fraught with rabbit holes and hours passed.

If you make it to the end, please advise... Is my thinking correct?

One should always think things through and not just 'know it'. Coil wiring for example. OEM. The three coils all had pink wires going to a ballast resistor on one end. The other end (yellow/red) tied back into the wiring harness.  Out comes the ballast resistor. Now time to wire up the new coils. Should be simple, right? Connect the + side of coil to appropriate igniter wire. Take - side of coil to ground.Then got to thinking about it... Better look at a schematic.The question now is, how does this circuit really work?
  1. Should coil negative be grounded and the ignitier (Darlington transistors) pulse coil primary to establish field that collaspes and makes secondary high voltage? Or,
  2. Is 12vdc provided from Engine Stop Switch to the Pink wired side of the coils, and then the igniter is breaking current flow, thus inducing a field?
The diagram above shows the entire circuit.
Diagram above shows how I *think* the circuit works.. 
  1. 12 volts is provided via a 10 amp fuse (#1) Brown wire.
  2. Which then travels up to the Engine Stop Switch (#2, 3, 4)
  3. Then through #5, 6, 7 to igniter / Darlingtons  (yellow red)
  4. Refer to top diagram, the Igniter does it magic to open/make the circuit and induce volts into primary winding?
I think it's how it works..Found more info...The diagram below shows the A1 ignition circuit. From FSM. Coil has been replaced, Resistor as well. So yes, coil + primary side needs to connect Yellow/Red from main harness (which goes to Igniter).
Final question is:
  1. If coil is marked with a positive (+) terminal, should Yellow-Red be connected there? Or from one of the 3 colored wires from the Igniter?

Please Log in or Create an account to join the conversation.

Replacement Coil Wiring question - eliminating ballast resistor 5 months 3 days ago #31760

  • Kawboy
  • Kawboy's Avatar
  • Offline
  • Sustaining Member
  • Sustaining Member
  • Posts: 2997
  • Thank you received: 1029
The Yellow / red wire feeds System Voltage to the Ballast Resistor. (System voltage = Battery voltage + charging voltage)
The Ballast Resistor drops the supplied voltage to the coils by inducing a resistance in the circuit
The 3 pink wires feed the reduced voltage after the ballast resistor to the positive terminals of the 3 ignition coils.
The Black, Green and Blue wires coming off of the negative terminals of the ignition coils are switched to ground through the Darlington transistors in the igniter. 
If all you want to do is remove the ballast resistor, then take the 3 pink wires and connect them to the yellow/red wire and you're done. Bob's your Uncle, Mary's your Aunt.  E'tutto Finito

Testing a circuit
First, let's talk about a voltage meter. A voltage meter measures the difference in voltage between the negative black lead and the positive red lead of the voltage meter. Most people will use a voltage meter to check for supplied voltage by hooking up the negative lead to the ground of the battery and then touching the positive lead to different parts of a circuit to see if they "have voltage". A simple test to see if you have a completed circuit but that's all.
In your diagram above, you have battery voltage supplying the Fuse, then the Main Switch, then the Ignition Switch, then the Engine Stop Switch then the Yellow / Red wire feeding the Ballast Resistor. In a perfect world, there would be no resistance in that part of the circuit so if you take your volt meter and attach the black lead to the negative battery terminal and attach the red lead to the yellow/red lead at the Ballast Resistor, you should see "Battery Voltage" ( If battery voltage was 12.8 volts, then the voltage at the ballast resistor should be 12.8 volts)

A better test would be to attach the negative lead to the positive terminal of the battery and then touch the red lead of the voltage meter to the yellow / red wire at the ballast resistor but now we need to understand what we are measuring and why do it this way. Back to the initial statement a voltage meter measures the difference in voltage between the negative black lead and the positive red lead of the voltage meter. So, in this test we are going to measure the difference in voltage between the red terminal of the battery and the yellow / red wire feeding the ballast resistor. In our perfect world, there would be no resistance so the voltage drop should be zero. So, do the test and you’re looking for zero voltage but what if the volt meter showed 1.8 volts? Difference in voltage means resistance is in that part of the circuit so how do we find the resistance that caused the voltage drop?

One way could be to go back to the first test and hook up the negative lead of the volt meter to the battery ground terminal and then take the red lead and check different parts of the circuit and go looking for Battery voltage at each and every point of the circuit. That test works in a circuit with no resistance in it and you could find the fault. A better test is to use the volt meter and test the voltage difference between the input side of a component and the output side of a component.

So, let’s say we want to find the 1.8 volt drop in your circuit. We have 9 components in your supplied voltage to the ballast resistor that could be a problem. What? I only see 4 items. Wrong. We have. The wire between the battery and the fuse. The Fuse. The wire between the fuse and the main switch. The main switch. The wire between the main switch and the ignition switch. The ignition switch. The wire between the ignition switch and the engine kill switch. The engine kill switch. And finally, the wire between the engine kill switch and the ballast resistor. Now you could use the first test and look for 12.8 volts at each and every point in the circuit but a better test would be to using your volt meter leads, go across each point in the circuit and look for zero volts, meaning no voltage drop.

The point I’m trying to get across is that looking for voltage drop in different parts of a circuit is easier to find than testing from the beginning of a circuit to the end of a circuit so why learn this different testing manner?? If you wanted to test the entire circuit with known resistance in the circuit like the ballast resistor and the ignition coils, if we go looking for faults in parts of the circuit, ie. Voltage drops in parts of the circuit that shouldn’t have voltage drops, we can find the faults. If we use the first test, then we would have to account for the voltage drop at the ballast resistor before testing out the voltage after the ballast resistor. We could, in a circuit with only 2 known resistors but what if we had a circuit with 30 resistors in it. Now it’s a daunting task.

That’s why you want to learn how to do a voltage drop test and what to expect. You could do a similar test using an Ohm meter and look for those individual resistances across the 9 components and you’ve done the exact same test using a volt meter and a supplied battery voltage. That Ohm meter is nothing more than a volt meter with an internal 9 volt battery and the scale you read is actually the volt meter scale only the calculated resistance is built into the scale. Apples and apples – maybe, but your test was at 9 volts and not at supplied voltage. In a 12 volt system, using a 9 volt supply power to do the test is fine, but what if the supplied voltage was 30,000 volts. Now things get a little hairy to figure out.

That’s all I got for now. 
The following user(s) said Thank You: dcarver220b

Please Log in or Create an account to join the conversation.

Last edit: by Kawboy.

Replacement Coil Wiring question - eliminating ballast resistor 5 months 3 days ago #31761

  • dcarver220b
  • dcarver220b's Avatar Topic Author
  • Offline
  • Sustaining Member
  • Sustaining Member
  • Posts: 779
  • Thank you received: 181
Thank You KB, sincerely said and greatly appreciated. 

One nuclear tenet is 'stop if unsure'. Which I did on this project. Tried to think the process through in my own head and then reach out for verification/validation. You supplied that part.

And your volt meter sleuthing is spot-on. I've used both techniques numerous times over the years. I recall taking color TV repair classes at junior college. Ran across a circuit with 'elevated ground'... and could not, for the life of me, wrap my brain around how 'ground', or zero-reference point, could start at 1kv to chassis ground, LOL.

Looks like my next step will be to remove the coils <again>, build a 1 wire to 3 wire splitter (yellow-red from harness) to positive terminal of each coil. Also need to reverse coil connections as they currently (no pun intended!) have Igniter wires on positive terminals.

I've read that coil polarity doesn't really matter... that if reversed the spark will originate from electrode to plug center conductor. But that just seems awkward, LOL.

One last thought. I'm troubleshooting an excessive alternator charging problem on my CBX. Current thinking is voltage drop(s) in the system (key switch, kill switch, connectors, etc) is dragging alternator sense voltage down, fooling the alternator into producing maximum voltage, about 16.5 volts. Your technique might just help me find the voltage drops.
 

Please Log in or Create an account to join the conversation.

Replacement Coil Wiring question - eliminating ballast resistor 5 months 2 days ago #31762

  • Kawboy
  • Kawboy's Avatar
  • Offline
  • Sustaining Member
  • Sustaining Member
  • Posts: 2997
  • Thank you received: 1029
The CBX has an energized field and typically what happens with the CBX's is a short circuit develops in the rotor windings causing a high load in the transistors in the voltage regulator causing the transistors to stick closed. You'll probably end up condemning the regulator but before you replace it, check the rotor windings for the proper resistance. If the resistance is low, suspect a short in the windings.

Please Log in or Create an account to join the conversation.

Replacement Coil Wiring question - eliminating ballast resistor 5 months 1 day ago #31765

  • dcarver220b
  • dcarver220b's Avatar Topic Author
  • Offline
  • Sustaining Member
  • Sustaining Member
  • Posts: 779
  • Thank you received: 181
Thanks again KB :)

I have an entire thread started on my CandyButt.Org website... But I'm going to start from scratch again... to help, perhaps, not falling into the 'I know this' trap, to keep eyes open for clues. 

I'll post up on a separate thread, even though it's not a Kz1300 issue. 

I truly appreciate your advice. Never met a 'mechanic' like you before. That's a huge compliment. :)
 
The following user(s) said Thank You: Kawboy

Please Log in or Create an account to join the conversation.

Replacement Coil Wiring question - eliminating ballast resistor 4 months 4 weeks ago #31774

  • kawaBCN
  • kawaBCN's Avatar
  • Offline
  • Elite Member
  • Elite Member
  • Posts: 180
  • Thank you received: 60
Greetings.

After removing and installing the coils on my bike several times to access the cylinder head cover, I noticed the failure in one of them, it did not have a good spark and it worked when it felt like it.

It still has the original coils and resistor from 40 years ago so I have chosen to change all three, I have found some 3.5 ohm ones so I will not have to use resistor again.

This is the link to the manufacturer's page.

www.squaremotorcycleparts.co.uk/products...300-z-1300-1979-1982
RUN LIKE THE WIND¡¡¡
The following user(s) said Thank You: Kawboy

Please Log in or Create an account to join the conversation.

  • Page:
  • 1
  • 2
Time to create page: 0.097 seconds
Powered by Kunena Forum