
79 KZ refurb
- bonyt
-
 Topic Author
- Offline
- New Member
-

- Posts: 9
- Thanks: 2
Re: 79 KZ refurb
2 months 21 hours ago
Thanks Scotch, this was the feedback I was looking for.
Will do correct setup tomorrow,
Thanks again.
Will do correct setup tomorrow,
Thanks again.
Please Log in or Create an account to join the conversation.
- scotch
-

- Offline
- Sustaining Member
-

- Posts: 2030
- Thanks: 933
Re: 79 KZ refurb
2 months 8 hours ago
Always glad to help those who make references to using the Manual, can explain their efforts with some detail and use pictures to elaborate !
Hope you get things sorted out !
Hope you get things sorted out !
1980 KZ 1300 sr# KZT30A-009997
Always High - Know Fear !
Always High - Know Fear !
The following user(s) said Thank You: KZQ
Please Log in or Create an account to join the conversation.
- scotch
-
- Offline
- Sustaining Member
-
- Posts: 2030
- Thanks: 933
Re: 79 KZ refurb
2 months 1 hour ago - 2 months 1 hour ago
Further to helping with your carb. Set-up:
I pointed out your sync. adjustment screws appearing to be too far out. This could be a result of the bottom “Ball-Seat” not being correctly positioned.
It’s easy to miss this when assembling the link-rods. #1
A small bit of grease will hold the bottom ball-seat in place! If this piece isn’t positioned properly, (upside down) it will move everything higher within the rod and this can account for the excess number of threads showing above the rod, itself. It might even be that 1 of the 2 ball-seat Pins have been installed upside down.
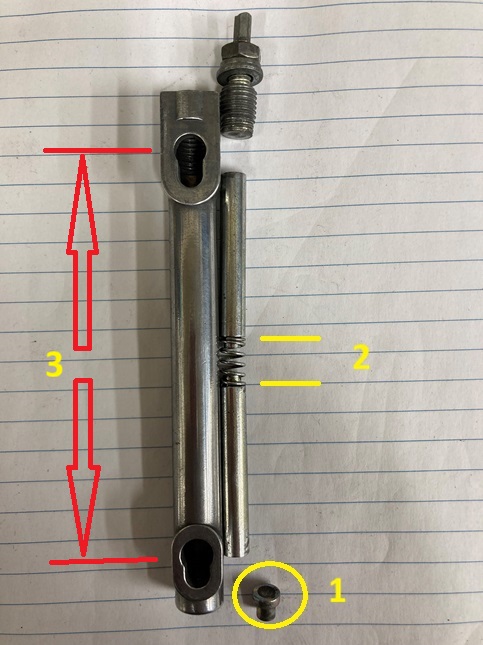
Adjusting the Sync-screw changes the distance between the Main throttle Shaft Ball (Top) and the Carb-shaft Ball (Bottom) . #3 Because the Return Spring on the Main Throttle Shaft is Stronger then the Carb Shaft return spring (for the Throttle plates) any adjustment will open or close (respectively) the Throttle plates.
I pointed out your sync. adjustment screws appearing to be too far out. This could be a result of the bottom “Ball-Seat” not being correctly positioned.
It’s easy to miss this when assembling the link-rods. #1
A small bit of grease will hold the bottom ball-seat in place! If this piece isn’t positioned properly, (upside down) it will move everything higher within the rod and this can account for the excess number of threads showing above the rod, itself. It might even be that 1 of the 2 ball-seat Pins have been installed upside down.
Adjusting the Sync-screw changes the distance between the Main throttle Shaft Ball (Top) and the Carb-shaft Ball (Bottom) . #3 Because the Return Spring on the Main Throttle Shaft is Stronger then the Carb Shaft return spring (for the Throttle plates) any adjustment will open or close (respectively) the Throttle plates.
1980 KZ 1300 sr# KZT30A-009997
Always High - Know Fear !
Always High - Know Fear !
Last edit: 2 months 1 hour ago by scotch.
The following user(s) said Thank You: biltonjim
Please Log in or Create an account to join the conversation.
- bonyt
-
Topic Author
- Offline
- New Member
-
- Posts: 9
- Thanks: 2
Re: 79 KZ refurb
1 month 3 weeks ago - 1 month 3 weeks ago
Finally had a day to get this figured out.
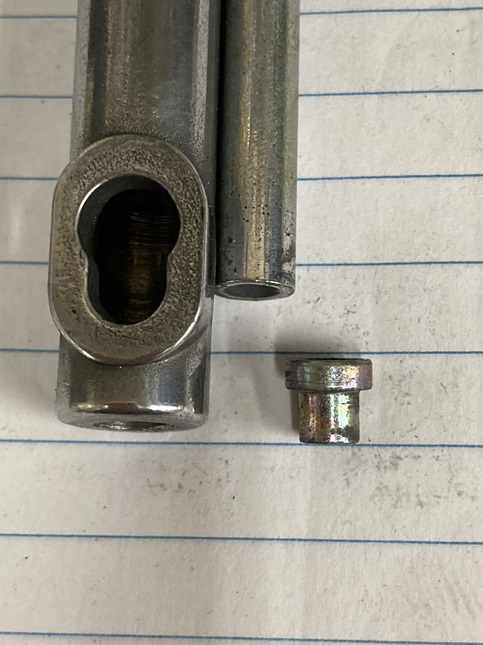
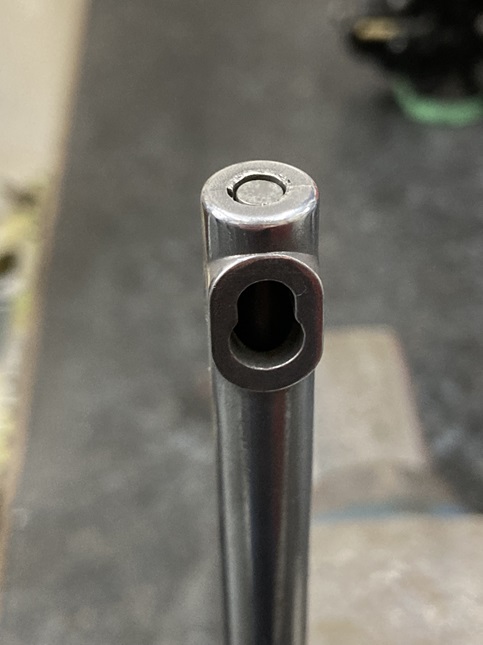
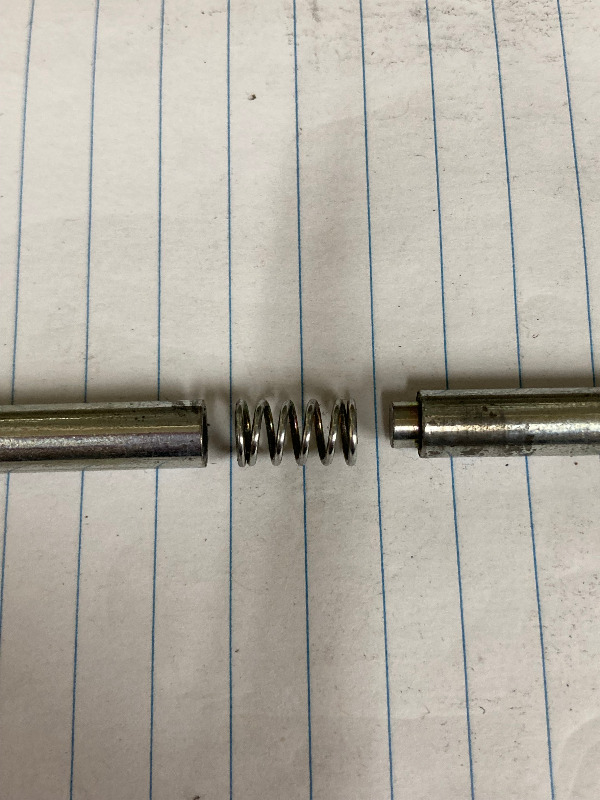
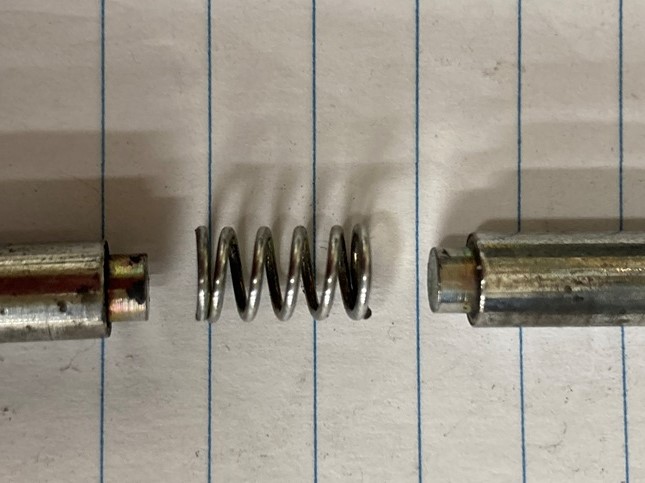
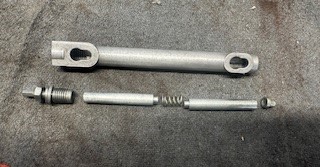
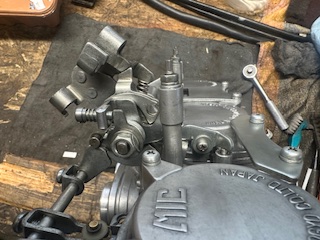
I took off one of the rods and wanted to double check that I installed everything correctly.
Turns out I did install everything correctly.
Here is what it looks like as I removed it. I removed the remaining 2 rods and they were the same.
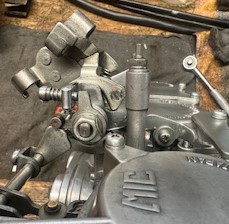
Then I spent some time getting the static synch setup.
I cut up some strips of envelope material about 3/16" wide and measuring at 0.006" thickness and inserted them into the butterfly valves.
After some fiddling,
There is .006" gap on the butterfly valves.
There is a gap at the choke cam and roller, the hard stop is now open, and only a few threads showing on the adjuster.
I think the reason why I had so many threads showing on my earlier pics is because I used a much wider steel feeler guage,
(maybe 10mm wide) on the butterfly valves and it held the valve open way more than the .006".
Once I put the thinner strips of the envelope material into the valves, it all came together to make more sense.
With the choke set at the highest point on the cam, I set the idle at 1.5 mm or 0.059, slightly more than the .54-.55 as stated in the manual.
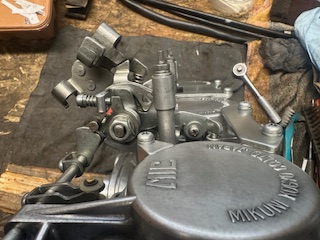
Last pic shows the choke cam just beyond the the highest point, with clearnace, which is the same as idle position.
Thanks for all the advice.
This will be a good starting point for when the real action begins and the carbs are installed on the bike and ready to fire up.
BTW, I have set the idle mixture screws at 3 full turns out. Did see some threads on this site that states 3 to 3 1/2 turns out as starting point.
Can someone explain why the starting point is 3 to 3 1/2, yet the service manual is showing the 1 3/4 to 2 1/4 turns out, (which mine was set at btw).
And where did you wind up, and are all carbs the same set up or is the middle carb different than the other two?
I took off one of the rods and wanted to double check that I installed everything correctly.
Turns out I did install everything correctly.
Here is what it looks like as I removed it. I removed the remaining 2 rods and they were the same.
Then I spent some time getting the static synch setup.
I cut up some strips of envelope material about 3/16" wide and measuring at 0.006" thickness and inserted them into the butterfly valves.
After some fiddling,
There is .006" gap on the butterfly valves.
There is a gap at the choke cam and roller, the hard stop is now open, and only a few threads showing on the adjuster.
I think the reason why I had so many threads showing on my earlier pics is because I used a much wider steel feeler guage,
(maybe 10mm wide) on the butterfly valves and it held the valve open way more than the .006".
Once I put the thinner strips of the envelope material into the valves, it all came together to make more sense.
With the choke set at the highest point on the cam, I set the idle at 1.5 mm or 0.059, slightly more than the .54-.55 as stated in the manual.
Last pic shows the choke cam just beyond the the highest point, with clearnace, which is the same as idle position.
Thanks for all the advice.
This will be a good starting point for when the real action begins and the carbs are installed on the bike and ready to fire up.
BTW, I have set the idle mixture screws at 3 full turns out. Did see some threads on this site that states 3 to 3 1/2 turns out as starting point.
Can someone explain why the starting point is 3 to 3 1/2, yet the service manual is showing the 1 3/4 to 2 1/4 turns out, (which mine was set at btw).
And where did you wind up, and are all carbs the same set up or is the middle carb different than the other two?
Last edit: 1 month 3 weeks ago by bonyt.
The following user(s) said Thank You: stocktoy
Please Log in or Create an account to join the conversation.
- scotch
-
- Offline
- Sustaining Member
-
- Posts: 2030
- Thanks: 933
Re: 79 KZ refurb
1 month 3 weeks ago
Outstanding ! And again: I can't tell you how gratifying it is to work with you on this. You provide good explanations and good pictures !!!!
Regarding the pilot needles: It's been long ago accepted that the 1.5 turns the Manual states is a misprint. I also believe (personally) that the .54 -.55 gap on the idle arm is also a misprint.
I admire your diligence in disassembling the link-rods to verify they were assembled correctly.
"Until you understand, you'll never know. Until you know, you'll never understand" !
1980 KZ 1300 sr# KZT30A-009997
Always High - Know Fear !
Always High - Know Fear !
Please Log in or Create an account to join the conversation.
- murderhornet
-

- Offline
- Junior Member
-

- Posts: 11
- Thanks: 2
Re: 79 KZ refurb
1 month 2 weeks ago
I wanted to say how much this thread with the clear pictures and explanations helped me diagnose and sort out an unruly carb that I just couldn't get to idle correctly. Thanks to you both bonyt and scotch!
The following user(s) said Thank You: scotch
Please Log in or Create an account to join the conversation.
Moderators: dcarver220b
Time to create page: 0.175 seconds